Managing Files and Directories
This chapter presents commands to do things that are typically handled by a file manager in GUI (also known as file explorer). For example, viewing contents of a directory, navigating to other directories, cut/copy/paste files, renaming files and so on. Some of the commands used for these purposes are provided by the shell itself.
As a good practice, make it a habit to go through the documentation of the commands you encounter. Getting used to looking up documentation from the command line will come in handy whenever you are stuck. You can also learn and experiment with options you haven't used yet.
The example_files directory has the scripts used in this chapter. See the Setup section for instructions to create the working environment.
Builtin and External commands
From bash manual: What is a shell?
Shells also provide a small set of built-in commands (builtins) implementing functionality impossible or inconvenient to obtain via separate utilities. For example,
cd,break,continue, andexeccannot be implemented outside of the shell because they directly manipulate the shell itself. Thehistory,getopts,kill, orpwdbuiltins, among others, could be implemented in separate utilities, but they are more convenient to use as builtin commands.
Many of the commands needed for everyday use are external commands, i.e. not part of the shell. Some builtins, pwd for example, might also be available as external command on your system (and these might have differences in features too). In such cases the builtin version will be executed by default, which you can override by using the path of the external version.
You can use the type command to check if the tool you are using is a builtin or an external command. The type command is a shell builtin, and provides other features too (which will be discussed later). You can use the -a option to get all details about the given command.
$ type -a cd
cd is a shell builtin

$ type -a ls
ls is /bin/ls

$ type -a pwd
pwd is a shell builtin
pwd is /bin/pwd
To look up documentation, use the
helpcommand for builtins andmanfor external commands (orinfofor complete documentation, where applicable). Usehelp helpandman manfor their own documentation.
helpwill give the list of builtins, along with the command's syntax.
pwd
pwd is a shell builtin command to get the current working directory. This helps to orient yourself with respect to the filesystem. The absolute path printed is often handy to copy-paste elsewhere, in a script for example. Some users prefer their terminal emulators and/or shell prompt to always display the current working directory.
$ pwd
/home/learnbyexample
cd
cd is another shell builtin. This helps to change the current working directory. Here's an example of changing the current working directory using an absolute path:
$ pwd
/home/learnbyexample

# specifying / at end of the path is optional
$ cd /etc
$ pwd
/etc
You can use - as an argument to go back to the previous working directory. Continuing from the previous example:
$ cd -
/home/learnbyexample
-as a command option. You can use--to tell commands that all the following arguments should not be treated as options even if they start with-. For example, if you have a folder named-oopsin the current working directory, you can usecd -- -oopsto switch to that directory.
Relative paths are well, relative to the current working directory:
.refers to the current directory..refers to the directory one hierarchy above (i.e. the parent directory)../..refers to the directory two hierarchies above and so oncd ./-will help you to switch to a directory named-in the current location- you cannot use
cd -since that'll take you to the previous working directory
- you cannot use
$ pwd
/home/learnbyexample

# go one hierarchy above
$ cd ..
$ pwd
/home

# change to 'learnbyexample' present in the current directory
# './' is optional in this case
$ cd ./learnbyexample
$ pwd
/home/learnbyexample

# go two hierarchies above
$ cd ../..
$ pwd
/
You can switch to the home directory using cd or cd ~ or cd ~/ from anywhere in the filesystem. This is determined by the value stored in the HOME shell variable. See also bash manual: Tilde Expansion.
$ pwd
/
$ echo "$HOME"
/home/learnbyexample

$ cd
$ pwd
/home/learnbyexample
clear
You can use this command to clear the terminal screen. By default, the clear command will move the prompt to the top of the terminal as well as try to remove the contents of the scrollback buffer. You can use the -x option if you want to retain the scrollback buffer contents.
Ctrl+lshortcut will also move the prompt line to the top of the terminal. It will retain any text you've typed on the prompt line and scrollback buffer contents won't be cleared.
ls
When you use a file explorer GUI application, you'll automatically see the directory contents. And such GUI apps typically have features to show file size, differentiate between files and folders and so on. ls is the equivalent command line tool with a plethora of options and functionality related to viewing the contents of directories.
ls.shscript to follow along the examples shown in this section. See the Setup section if you haven't yet created the working environment.# first, cd into the 'scripts' directory $ cd cli-computing/example_files/scripts $ ls cp.sh file.sh globs.sh ls.sh rm.sh tar.sh du.sh find.sh grep.sh mv.sh stat.sh touch.sh # 'ls.sh' script will create a directory named 'ls_examples' # and automatically change to that directory as well $ source ls.sh $ pwd /home/learnbyexample/cli-computing/example_files/scripts/ls_examples
By default, the current directory contents are displayed. You can pass one or more paths as arguments. Here are some examples:
$ ls
backups     hello_world.py  ip.txt    report.log  todos
errors.log  hi              projects  scripts

# example with a single path argument
$ ls /sys
block  class  devices   fs          kernel  power
bus    dev    firmware  hypervisor  module

# multiple paths example
# directory listings will be preceded by their names
$ ls projects backups ip.txt
ip.txt

backups:
bookmarks.html  dot_files

projects:
calculator  tictactoe
You can use the -1 option (1 as in numeric one, not the letter l which does something else) to list the contents in a single column:
$ ls -1 backups
bookmarks.html
dot_files
The -F option appends a character to each filename indicating the file type (if it is other than a regular file):
/directory*executable file@symbolic link|FIFO=socket>door
$ ls -F
backups/    hello_world.py*  ip.txt     report.log  todos/
errors.log  hi*              projects/  scripts@
If you just need to distinguish between files and directories, you can use the -p option:
$ ls -p
backups/    hello_world.py  ip.txt     report.log  todos/
errors.log  hi              projects/  scripts
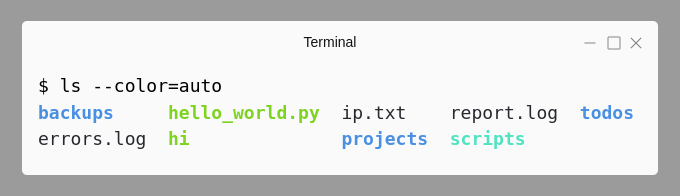
You can also use the --color option to visually distinguish file types:
The -l option displays the contents using a long listing format. You'll get details like file permissions, ownership, size, timestamp and so on. The first character of the first column distinguishes file types as d for directories, - for regular files, l for symbolic links, etc. Under each directory listing, the first line will display the total size of the entries (in terms of KB).
$ ls -l hi
-rwxrwxr-x 1 learnbyexample learnbyexample 21 Dec  5  2019 hi

# you can add -G option to avoid the group column
$ ls -lG
total 7516
drwxrwxr-x 3 learnbyexample    4096 Feb  4 09:23 backups
-rw-rw-r-- 1 learnbyexample   12345 Jan  1 03:30 errors.log
-rwxrwxr-x 1 learnbyexample      42 Feb 29  2020 hello_world.py
-rwxrwxr-x 1 learnbyexample      21 Dec  5  2019 hi
-rw-rw-r-- 1 learnbyexample      10 Jul 21  2017 ip.txt
drwxrwxr-x 4 learnbyexample    4096 Mar  5 11:21 projects
-rw-rw-r-- 1 learnbyexample 7654321 Jan  1 01:01 report.log
lrwxrwxrwx 1 learnbyexample      13 May  7 15:17 scripts -> ../../scripts
drwxrwxr-x 2 learnbyexample    4096 Apr  6 13:19 todos
Note that the timestamps showing hours and minutes instead of year depends on the relative difference with respect to the current time. So, for example, you might get
Feb 4 2022instead ofFeb 4 09:23.
Use the -h option to show file sizes in human readable format (default is byte count).
$ ls -lG report.log
-rw-rw-r-- 1 learnbyexample 7654321 Jan  1 01:01 report.log

$ ls -lhG report.log
-rw-rw-r-- 1 learnbyexample 7.3M Jan  1 01:01 report.log
You can use the -s option instead of long listing if you only need allocated file sizes and names:
$ ls -1sh errors.log report.log
 16K errors.log
7.4M report.log
There are several options for changing the order of listing:
-tsorts by timestamp-Ssorts by file size (not suitable for directories)-vversion sorting (suitable for filenames with numbers in them)-Xsorts by file extension (i.e. characters after the last.in the filename)-rreverse the listing order
$ ls -lGhtr
total 7.4M
-rw-rw-r-- 1 learnbyexample   10 Jul 21  2017 ip.txt
-rwxrwxr-x 1 learnbyexample   21 Dec  5  2019 hi
-rwxrwxr-x 1 learnbyexample   42 Feb 29  2020 hello_world.py
-rw-rw-r-- 1 learnbyexample 7.3M Jan  1 01:01 report.log
-rw-rw-r-- 1 learnbyexample  13K Jan  1 03:30 errors.log
drwxrwxr-x 3 learnbyexample 4.0K Feb  4 09:23 backups
drwxrwxr-x 4 learnbyexample 4.0K Mar  5 11:21 projects
drwxrwxr-x 2 learnbyexample 4.0K Apr  6 13:19 todos
lrwxrwxrwx 1 learnbyexample   13 May  7 15:17 scripts -> ../../scripts
Filenames starting with . are considered as hidden files and these are NOT shown by default. You can use the -a option to view them. The -A option is similar, but doesn't show the special . and .. entries.
# . and .. point to the current and parent directories respectively
$ ls -aF backups/dot_files/
./  ../  .bashrc  .inputrc  .vimrc

# -A will exclude the . and .. entries
$ ls -A backups/dot_files/
.bashrc  .inputrc  .vimrc
The -R option recursively lists sub-directories as well:
$ ls -ARF
.:
backups/    hello_world.py*  .hidden  projects/   scripts@
errors.log  hi*              ip.txt   report.log  todos/

./backups:
bookmarks.html  dot_files/

./backups/dot_files:
.bashrc  .inputrc  .vimrc

./projects:
calculator/  tictactoe/

./projects/calculator:
calc.sh

./projects/tictactoe:
game.py

./todos:
books.txt  outing.txt
Often you'd want to list only specific files or directories based on some criteria, file extension for example. The shell provides a matching technique called globs or wildcards. Some simple examples are shown below (see the wildcards section for more details).
* is a placeholder for zero or more characters:
# *.py *.log will give filenames ending with '.py' or '.log'
$ echo *.py *.log
hello_world.py errors.log report.log

# glob expansion can be prevented by using quotes
$ echo '*.py' *.log
*.py errors.log report.log

# long list only files ending with '.log'
$ ls -lG *.log
-rw-rw-r-- 1 learnbyexample   12345 Jan  1 03:30 errors.log
-rw-rw-r-- 1 learnbyexample 7654321 Jan  1 01:01 report.log
[] helps you specify a set of characters to be matched once. For example, [ad] matches a or d once. [c-i] matches a range of characters from c to i.
# entries starting with 'c' to 'i'
$ echo [c-i]*
errors.log hello_world.py hi ip.txt

$ ls -1sh [c-i]*
 16K errors.log
4.0K hello_world.py
4.0K hi
4.0K ip.txt
lscommand, which is why I've deliberately usedechoas well in the above examples.
You can use the -d option to not show directory contents:
$ echo b*
backups
# since backups is a directory, ls will show its contents
$ ls b*
bookmarks.html  dot_files
# -d will show the directory entry instead of its contents
$ ls -d b*
backups

# a handy way to get only the directory entries
$ echo */
backups/ projects/ scripts/ todos/
$ ls -1d */
backups/
projects/
scripts/
todos/
ls --helpcommand.
Further Reading
- mywiki.wooledge: avoid parsing output of ls
- unix.stackexchange: why not parse ls?
- unix.stackexchange: What are ./ and ../ directories?
tree
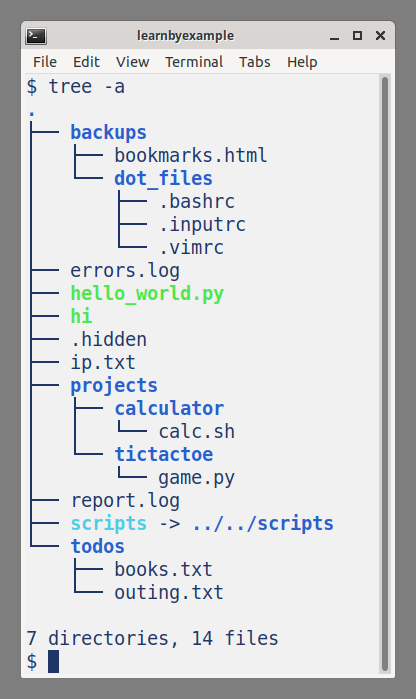
The tree command displays the contents of a directory recursively, in a hierarchical manner. Here's a screenshot of using tree -a from the ls_examples sample directory seen in the previous section. The -a option is used to show the hidden files as well.
sudo apt install treecan be used to get this command on Debian-like distributions.
mkdir
The mkdir command helps you to create new directories. You can pass one or more paths along with the name of the directories you want to create. Quote the names if it can contain shell special characters like space, * and so on.
$ mkdir practice_mkdir
$ cd practice_mkdir
Here's an example of creating multiple directories:
$ mkdir reports 'low power adders'

$ ls -1
'low power adders'
reports
The -p option will help you to create multiple directory hierarchies in one shot:
# error because 'a' and 'a/b' paths do not exist yet
$ mkdir a/b/c
mkdir: cannot create directory ‘a/b/c’: No such file or directory

# -p is handy in such cases
$ mkdir -p a/b/c

$ tree
.
├── a
│   └── b
│       └── c
├── low power adders
└── reports

5 directories, 0 files
The -p option has another functionality too. It will not complain if the directory you are trying to create already exists. This is especially helpful in shell scripts.
# 'reports' directory was already created in an earlier example
$ mkdir reports
mkdir: cannot create directory ‘reports’: File exists
# exit status will reflect that something went wrong
$ echo $?
1

# the -p option will override such errors
$ mkdir -p reports
$ echo $?
0
As seen in the examples above, you can check the exit status of the last executed command using the $? special variable. 0 means everything went well and higher numbers indicate some sort of failure has occurred (the details of which you can look up in the command's manual).
Linux filenames can use any character other than
/and the ASCII NUL character. Quote the arguments if it contains characters like space,*, etc to prevent shell expansion. Shell considers space as the argument separator,*is a wildcard character and so on. As a good practice, use only alphabets, numbers and underscores for filenames, unless you have some specific requirements. See also unix.stackexchange: Characters best avoided in filenames.
$ cd ..
$ rm -r practice_mkdir
touch
You'll usually create files using a text editor or by redirecting the output of a command to a file. For some cases, empty files are needed for testing purposes or to satisfy a particular build process. A real world use case is the empty .nojekyll file for GitHub Pages.
The touch command's main functionality is altering timestamps (which will be discussed in the File Properties chapter). If a file doesn't exist, touch will create an empty file using the current timestamp. You can also pass more than one file argument if needed.
$ mkdir practice_touch
$ cd practice_touch

$ ls ip.txt
ls: cannot access 'ip.txt': No such file or directory

$ touch ip.txt

$ ls -s ip.txt
0 ip.txt
> ip.txtas well, but the redirection operator will overwrite the file if it already exists.
rm
The rm command will help you to delete files and directories. You can pass one or more paths as arguments.
# change to the 'scripts' directory and source the 'rm.sh' script
$ source rm.sh
$ ls -F
empty_dir/  hello.py  loops.py  projects/  read_only.txt  reports/

# delete files ending with .py
$ rm *.py
$ ls -F
empty_dir/  projects/  read_only.txt  reports/
You'll need to add the -r option to recursively delete directory contents. You can use rm -d or the rmdir command to delete only empty directories.
# -r is needed to delete directory contents recursively
$ rm reports
rm: cannot remove 'reports': Is a directory
$ rm -r reports
$ ls -F
empty_dir/  projects/  read_only.txt

# delete empty directories, same as using the 'rmdir' command
$ rm -d empty_dir
# you'll get an error if the directory is not empty
$ rm -d projects
rm: cannot remove 'projects': Directory not empty
Typos like misplaced space, wrong glob, etc could wipe out files not intended for deletion. Apart from having backups and snapshots, you could also take some mitigating steps:
- using
-ioption to interactively delete each file- you can also use
-Ioption for lesser number of prompts
- you can also use
- using
echoas a dry run to see how the glob expands - using a trash command (see links below) instead of
rm
Use y for confirmation and n to cancel deletion with the -i or -I options. Here's an example of cancelling deletion:
$ rm -ri projects
rm: descend into directory 'projects'? n

$ ls -F
projects/  read_only.txt
And here's an example of providing confirmation at each step of the deletion process:
$ tree projects
projects
├── calculator
│   └── calc.sh
└── tictactoe
    └── game.py

2 directories, 2 files

$ rm -ri projects
rm: descend into directory 'projects'? y
rm: descend into directory 'projects/tictactoe'? y
rm: remove regular empty file 'projects/tictactoe/game.py'? y
rm: remove directory 'projects/tictactoe'? y
rm: descend into directory 'projects/calculator'? y
rm: remove regular empty file 'projects/calculator/calc.sh'? y
rm: remove directory 'projects/calculator'? y
rm: remove directory 'projects'? y

$ ls -F
read_only.txt
The -f option can be used to ignore complaints about non-existing files (somewhat similar to the mkdir -p feature). It also helps to remove write protected files (provided you have appropriate permissions to delete those files). This option is especially useful for recursive deletion of directories that have write protected files, .git/objects for example.
$ rm xyz.txt
rm: cannot remove 'xyz.txt': No such file or directory
$ echo $?
1
$ rm -f xyz.txt
$ echo $?
0

# example for removing write protected files
# you'll be asked for confirmation even without the -i/-I options
$ rm read_only.txt
rm: remove write-protected regular empty file 'read_only.txt'? n
# with -f, files will be deleted without asking for confirmation
$ rm -f read_only.txt
Further Reading
- Use a trash command (for example,
trash-clion Ubuntu) so that deleted files can be recovered later if needed - Files removed using
rmcan still be recovered with time and skill - Use commands like
shredif you want to make it harder to recover deleted files - My curated list for
gitand related resources
cp
You can use the cp command to make copies of files and directories. With default syntax, you have to specify the source first followed by the destination. To copy multiple items, the last argument as destination can only be a directory. You'll also need to use the -r option to copy directories (similar to rm -r seen earlier).
# change to the 'scripts' directory and source the 'cp.sh' script
$ source cp.sh
$ ls -F
backups/  reference/

# recall that . is a relative path referring to the current directory
$ cp /usr/share/dict/words .
$ ls -F
backups/  reference/  words

# error because -r is needed to copy directories
# other file arguments (if present) will still be copied
$ cp /usr/share/dict .
cp: -r not specified; omitting directory '/usr/share/dict'
$ cp -r /usr/share/dict .
$ ls -F
backups/  dict/  reference/  words
cpwill overwrite an existing file of the same name in the destination directory. You can use the-ioption to interactively confirm or deny overwriting existing files. The-noption will prevent overwriting existing files without asking for confirmation.
$ echo 'hello' > ip.txt
$ ls -F
backups/  dict/  ip.txt  reference/  words
$ ls backups
ip.txt  reports
$ cat backups/ip.txt
apple banana cherry
# file will be overwritten without asking for confirmation!
$ cp ip.txt backups/
$ cat backups/ip.txt
hello

# use -i to interactively confirm or deny overwriting
$ echo 'good morning' > ip.txt
$ cp -i ip.txt backups/
cp: overwrite 'backups/ip.txt'? n
$ cat backups/ip.txt
hello

# use -n to prevent overwriting without needing confirmation
$ cp -n ip.txt backups/
$ cat backups/ip.txt
hello
If there's a folder in the destination path with the same name as a folder being copied, the contents will be merged. If there are files of identical names in such directories, the same rules discussed above will apply.
$ tree backups
backups
├── ip.txt
└── reports
    └── jan.log

1 directory, 2 files

$ mkdir reports
$ touch reports/dec.log
$ cp -r reports backups/
$ tree backups
backups
├── ip.txt
└── reports
    ├── dec.log
    └── jan.log

1 directory, 3 files
Often, you'd want to copy a file (or a directory) under a different name. In such cases, you can simply use a new name while specifying the destination.
# copy 'words' file from source as 'words_ref.txt' at destination
$ cp /usr/share/dict/words words_ref.txt

# copy 'words' file as 'words.txt' under the 'reference' directory
$ cp /usr/share/dict/words reference/words.txt

# copy 'dict' directory as 'word_lists'
$ cp -r /usr/share/dict word_lists
As mentioned earlier, to copy multiple files and directories, you'll have to specify the destination directory as the last argument.
$ cp -r ~/.bashrc /usr/share/dict backups/

$ ls -AF backups
.bashrc  dict/  ip.txt  reports/
You can use the -t option to specify the destination before the source paths (helpful with the find command for example, will be discussed later). Here are some more notable options:
-ucopy files from source only if they are newer or don't exist in the destination-band--backupoptions will allow you to create backup copies of files already existing in the destination--preserveoption will help you to copy files along with source file attributes like ownership, timestamp, etc
Further Reading
rsynca fast, versatile, remote (and local) file-copying tool- syncthing — continuous file synchronization program
mv
You can use the mv command to move one or more files and directories from one location to another. Unlike rm and cp, you do not need the -r option for directories.
Syntax for specifying the source and destination is same as seen earlier with cp. Here's an example of moving a directory into another directory:
# change to the 'scripts' directory and source the 'mv.sh' script
$ source mv.sh
$ ls -F
backups/  dot_files/  hello.py  ip.txt  loops.py  manuals/
$ ls -F backups
projects/

$ mv dot_files backups

$ ls -F
backups/  hello.py  ip.txt  loops.py  manuals/
$ ls -F backups
dot_files/  projects/
Here's an example for moving multiple files and directories to another directory:
$ mv *.py manuals backups

$ ls -F
backups/  ip.txt
$ ls -F backups
dot_files/  hello.py  loops.py  manuals/  projects/
When you are dealing with a single file or directory, you can also rename them:
# within the same directory
$ mv ip.txt report.txt
$ ls -F
backups/  report.txt

# between different directories
$ mv backups/dot_files rc_files
$ ls -F
backups/  rc_files/  report.txt
$ ls -F backups
hello.py  loops.py  manuals/  projects/
Here are some more notable options, some of which behave similar to those seen with the cp command:
-iinteractively confirm or deny when the destination already has a file of the same name-nalways deny overwriting of files-falways overwrite files-tspecify the destination elsewhere instead of final argument-umove only if the files are newer or don't exist in the destination-band--backupoptions will allow you to create backup copies of files already existing in the destination-vverbose option
rename
The mv command is useful for simple file renaming. rename helps when you need to modify one or more filenames based on a pattern. There are different implementations of the rename command, with wildly different set of features. See askubuntu: What's the difference between the different "rename" commands? for details.
Perl implementation of the rename command will be discussed in this section. You'd need to know regular expressions to use this command. Basic explanations will be given here and more details can be found in the links mentioned at the end of this section. Here's an example to change the file extensions:
$ mkdir practice_rename
$ cd practice_rename
# create sample files
$ touch caves.jpeg waterfall.JPEG flower.JPG

# substitution command syntax is s/search/replace/flags
# \. matches . character literally
# e? matches e optionally (? is a quantifier to match 0 or 1 times)
# $ anchors the match to the end of the input
# i flag matches the input case-insensitively
$ rename 's/\.jpe?g$/.jpg/i' *

$ ls
caves.jpg  flower.jpg  waterfall.jpg
$ rm *.jpg
As a good practice, use the -n option to see how the files will be renamed before actually renaming the files.
$ touch 1.png 3.png 25.png 100.png
$ ls
100.png  1.png  25.png  3.png

# use the -n option for sanity check
# note that 100.png isn't part of the output, since it isn't affected
# \d matches a digit character
# \d+ matches 1 or more digits (+ is a quantifier to match 1 or more times)
# e flag treats the replacement string as Perl code
# $& is a backreference to the entire matched portion
$ rename -n 's/\d+/sprintf "%03d", $&/e' *.png
rename(1.png, 001.png)
rename(25.png, 025.png)
rename(3.png, 003.png)

# remove the -n option after sanity check to actually rename the files
$ rename 's/\d+/sprintf "%03d", $&/e' *.png
$ ls
001.png  003.png  025.png  100.png
If the new filename already exists, you'll get an error, which you can override with the -f option if you wish. If you are passing filenames with path components in them, you can use the -d option to affect only the filename portion. Otherwise, the logic you are using might affect directory names as well.
$ mkdir projects
$ touch projects/toc.sh projects/reports.py

# aim is to uppercase the non-extension part of the filename
# [^.]+ matches 1 or more non '.' characters
# \U changes the characters that follow to uppercase
# $& is a backreference to the entire matched portion
$ rename -n -d 's/[^.]+/\U$&/' projects/*
rename(projects/reports.py, projects/REPORTS.py)
rename(projects/toc.sh, projects/TOC.sh)

# without the -d option, directory name will also be affected
$ rename -n 's/[^.]+/\U$&/' projects/*
rename(projects/reports.py, PROJECTS/REPORTS.py)
rename(projects/toc.sh, PROJECTS/TOC.sh)
Further Reading
- perldoc: Regexp tutorial
- See my Perl one-liners ebook for examples and more details about the Perl substitution and
renamecommands
ln
The ln command helps you create a link to another file or directory within the same or different location. There are two types of links — symbolic links and hard links. Symbolic links can point to both files and directories. Here are some characteristics:
- if the original file is deleted or moved to another location, then the symbolic link will no longer work
- if the symbolic link is moved to another location, it will still work if the link was done using absolute path (for relative path, it will depend on whether or not there's another file with the same name in that location)
- a symbolic link file has its own inode, permissions, timestamps, etc
- some commands will work the same when original file or the symbolic file is given as the command line argument, while some require additional options (
du -Lfor example)
Usage is similar to the cp command. You have to specify the source first followed by the destination (which is optional if it is the current working directory).
$ mkdir practice_ln
$ cd practice_ln

# destination is optional for making a link in the current directory
# -s option is needed to make symbolic links
$ ln -s /usr/share/dict/words

# you can also rename the link if needed
$ ln -s /usr/share/dict/words words.txt
$ ls -1sF
total 0
0 words@
0 words.txt@
Long listing with ls -l will show the path connected to links. You can also use the readlink command, which has features like resolving recursively to the canonical file.
# to know which file the link points to
$ ls -lG words
lrwxrwxrwx 1 learnbyexample 21 Jul  9 13:41 words -> /usr/share/dict/words
$ readlink words
/usr/share/dict/words

# the linked file may be another link
# use -f option to get the original file
$ readlink -f words
/usr/share/dict/english
Hard links can only point to another file. You cannot use them for directories and the usage is also restricted to within the same filesystem. The . and .. directories are exceptions, these special purpose hard links are automatically created. Here are some more details about hard links:
- once a hard link is created, there is no distinction between the two files other than their paths. They have same inode, permissions, timestamps, etc
- hard links will continue working even if all the other hard links are deleted
- if a hard link is moved to another location, the links will still be in sync. Any change in one of them will be reflected in all the other links
$ touch apple.txt
$ ln apple.txt banana.txt

# the -i option gives inode
$ ls -1i apple.txt banana.txt
649140 banana.txt
649140 apple.txt
unlinkorrmcommands to delete links.
Further Reading
- askubuntu: What is the difference between a hard link and a symbolic link?
- unix.stackexchange: What is the difference between symbolic and hard links?
- unix.stackexchange: What is a Superblock, Inode, Dentry and a File?
tar and gzip
tar is an archiving utility. Depending on the implementation, you can also use options to compress the archive.
Here's an example that creates a single archive file from multiple input files and directories:
# change to the 'scripts' directory and source the 'tar.sh' script
$ source tar.sh
$ ls -F
projects/  report.log  todos/

# -c option creates a new archive, any existing archive will be overwritten
# -f option allows to specify a name for the archive being created
# rest of the arguments are the files/directories to be archived
$ tar -cf bkp.tar report.log projects

$ ls -F
bkp.tar  projects/  report.log  todos/
$ ls -sh bkp.tar
7.4M bkp.tar
Once you have an archive file, you can then compress it using tools like gzip, bzip2, xz, etc. In the below example, the command replaces the archive file with the compressed version and adds a .gz suffix to indicate that gzip was the technique used.
# the input '.tar' file will be overwritten with the compressed version
$ gzip bkp.tar

$ ls -F
bkp.tar.gz  projects/  report.log  todos/
$ ls -sh bkp.tar.gz
5.6M bkp.tar.gz
Use the -t option if you want to check the contents of the compressed file. This will work with the uncompressed .tar version as well.
$ tar -tf bkp.tar.gz
report.log
projects/
projects/scripts/
projects/scripts/calc.sh
projects/errors.log
To uncompress .gz files, you can use gunzip or gzip -d. This will replace the compressed version with the uncompressed archive file:
# this '.gz' file will be overwritten with the uncompressed version
$ gunzip bkp.tar.gz

$ ls -F
bkp.tar  projects/  report.log  todos/
$ ls -sh bkp.tar
7.4M bkp.tar
To extract the files from an archive, use tar along with the -x option:
$ mkdir test_extract
$ mv bkp.tar test_extract
$ cd test_extract
$ ls
bkp.tar

$ tar -xf bkp.tar
$ tree
.
├── bkp.tar
├── projects
│   ├── errors.log
│   └── scripts
│       └── calc.sh
└── report.log

2 directories, 4 files

$ cd ..
$ rm -r test_extract
With GNU tar, you can compress/uncompress along with the tar command instead of having to use tools like gzip separately. For example, the -z option will use gzip, -j will use bzip2 and -J will use xz. Use the -a option if you want tar to automatically select the compression technique based on the extension provided.
$ ls -F
projects/  report.log  todos/

# -z option gives same compression as the gzip command
$ tar -zcf bkp.tar.gz report.log projects
$ ls -sh bkp.tar.gz
5.6M bkp.tar.gz

# extract original files from compressed file
$ mkdir test_extract
$ cd test_extract
$ tar -zxf ../bkp.tar.gz
$ tree
.
├── projects
│   ├── errors.log
│   └── scripts
│       └── calc.sh
└── report.log

2 directories, 3 files

$ cd ..
$ rm -r test_extract
tar has lots and lots of options for various needs. Some are listed below, see documentation for complete details.
-vverbose option-rto append files to an existing archive--exclude=specify files to be ignored from archiving
There are also commands starting with z to work with compressed files, for example:
zcatto display file contents of a compressed filezlessto display file contents of a compressed file one screenful at a timezgrepto search compressed files
.zipfiles, use thezipandunzipcommands.
Further Reading
- unix.stackexchange: tar files with a sorted order
- superuser: gzip without tar? Why are they used together?
- unix.stackexchange: xz a directory with tar using maximum compression?
Exercises
ls.shscript will be used for some of the exercises.
1) Which of these commands will always display the absolute path of the home directory?
a) pwd
b) echo "$PWD"
c) echo "$HOME"
2) The current working directory has a folder named -dash. How would you switch to that directory?
a) cd -- -dash
b) cd -dash
c) cd ./-dash
d) cd \-dash
e) cd '-dash'
f) all of the above
g) only a) and c)
3) Given the directory structure as shown below, how would you change to the todos directory?
# change to the 'scripts' directory and source the 'ls.sh' script
$ source ls.sh

$ ls -F
backups/    hello_world.py*  ip.txt     report.log  todos/
errors.log  hi*              projects/  scripts@
$ cd projects
$ pwd
/home/learnbyexample/cli-computing/example_files/scripts/ls_examples/projects

# ???
$ pwd
/home/learnbyexample/cli-computing/example_files/scripts/ls_examples/todos
4) As per the scenario shown below, how would you change to the cli-computing directory under the user's home directory? And then, how would you go back to the previous working directory?
$ pwd
/home/learnbyexample/all/projects/square_tictactoe

# ???
$ pwd
/home/learnbyexample/cli-computing

# ???
$ pwd
/home/learnbyexample/all/projects/square_tictactoe
5) How'd you list the contents of the current directory, one per line, along with the size of the entries in human readable format?
# change to the 'scripts' directory and source the 'ls.sh' script
$ source ls.sh

# ???
total 7.4M
4.0K backups
 16K errors.log
4.0K hello_world.py
4.0K hi
4.0K ip.txt
4.0K projects
7.4M report.log
   0 scripts
4.0K todos
6) Which ls command option would you use for version based sorting of entries?
7) Which ls command option would you use for sorting based on entry size?
8) Which ls command option would you use for sorting based on file extension?
9) What does the -G option of ls command do?
10) What does the -i option of ls command do?
11) List only the directories as one entry per line.
# change to the 'scripts' directory and source the 'ls.sh' script
$ source ls.sh

# ???
backups/
projects/
scripts/
todos/
12) Assume that a regular file named notes already exists. What would happen if you use the mkdir -p notes command?
$ ls -1F notes
notes

# what would happen here?
$ mkdir -p notes
13) Use one or more commands to match the scenario shown below:
$ ls -1F
cost.txt

# ???

$ ls -1F
cost.txt
ghost/
quest/
toast/
14) Use one or more commands to match the scenario shown below:
# start with an empty directory
$ ls -l
total 0

# ???

$ tree -F
.
├── hobbies/
│   ├── painting/
│   │   └── waterfall.bmp
│   ├── trekking/
│   │   └── himalayas.txt
│   └── writing/
└── shopping/
    └── festival.xlsx

5 directories, 3 files
15) If directories to create already exist, which mkdir command option would you use to not show an error?
16) Use one or more commands to match the scenario given below:
$ ls -1F
cost.txt
ghost/
quest/
toast/

# ???

$ ls -1F
quest/
17) What does the -f option of rm command do?
18) Which option would you use to interactively delete files using the rm command?
19) Can the files removed by rm easily be restored? Do you need to take some extra steps or use special commands to make the files more difficult to recover?
20) Does your Linux distribution provide a tool to send deleted files to the trash (which would help to recover deleted files)?
21) Which option would you use to interactively accept/prevent the cp command from overwriting a file of the same name? And which option would prevent overwriting without needing manual confirmation?
22) Does the cp command allow you to rename the file or directory being copied? If so, can you rename multiple files/directories being copied?
23) What do the -u, -b and -t options of cp command do?
24) What's the difference between the two commands shown below?
$ cp ip.txt op.txt

$ mv ip.txt op.txt
25) Which option would you use to interactively accept/prevent the mv command from overwriting a file of the same name?
26) Use one or more commands to match the scenario shown below. You should have already created this directory structure in an earlier exercise.
$ tree -F
.
├── hobbies/
│   ├── painting/
│   │   └── waterfall.bmp
│   ├── trekking/
│   │   └── himalayas.txt
│   └── writing/
└── shopping/
    └── festival.xlsx

5 directories, 3 files

# ???

$ tree -F
.
├── hobbies/
│   ├── himalayas.txt
│   └── waterfall.bmp
└── shopping/
    └── festival.xlsx

2 directories, 3 files
27) What does the -t option of mv command do?
28) Determine and implement the rename logic based on the filenames and expected output shown below.
$ touch '(2020) report part 1.txt' 'analysis part 3 (2018).log'
$ ls -1
'(2020) report part 1.txt'
'analysis part 3 (2018).log'

# ???

$ ls -1
2020_report_part_1.txt
analysis_part_3_2018.log
29) Does the ln command follow the same order to specify source and destination as the cp and mv commands?
30) Which tar option helps to compress archives based on filename extension? This option can be used instead of -z for gzip, -j for bzip2 and -J for xz.