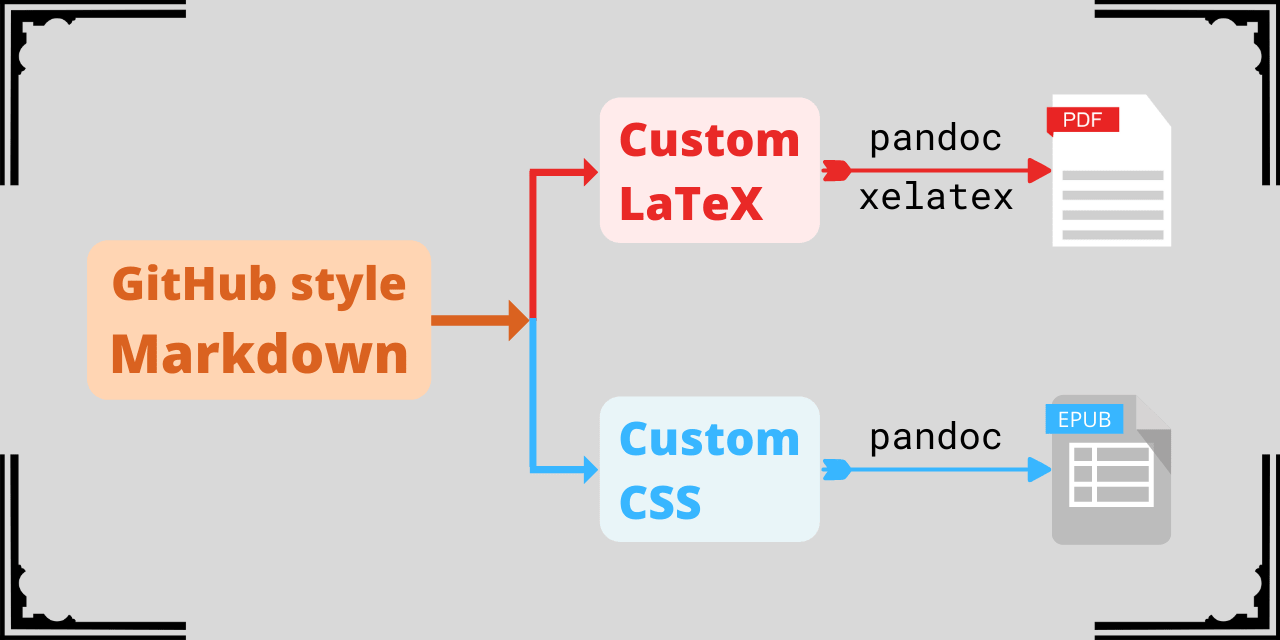
Customizing pandoc to generate beautiful pdf and epub from markdown
Either you've already heard of pandoc or if you have searched online for markdown to pdf or similar, you are sure to come across pandoc. This tutorial will help you use pandoc to generate pdf and epub versions from a GitHub style markdown file.
The main motivation for this blog post is to highlight the customizations I used for self-publishing my ebooks. It wasn't easy to arrive at the setup I ended up with, so I hope this will be useful for those looking to use pandoc for such a purpose. This guide is specifically aimed at technical books that has code snippets.
Poster created using Canva
Installation🔗
If you use a debian based distro like Ubuntu, the below steps are enough for the demos in this tutorial. If you get an error or warning, search that issue online and you'll likely find what else has to be installed.
I first downloaded deb file from pandoc: releases and installed it. Followed by packages needed for pdf generation.
# latest pandoc version as of 19 May 2025
$ sudo gdebi ~/Downloads/pandoc-3.7.0.1-1-amd64.deb

# note that download size is hundreds of MB
$ sudo apt install texlive-xetex
$ sudo apt install librsvg2-bin
$ sudo apt install texlive-science
For more details and instructions for other operating systems, refer to pandoc: installation.
Minimal example🔗
Once pandoc is working on your system, try generating a sample pdf without any customization.
 See learnbyexample.github.io repo for all the input and output files referred in this tutorial.
$ pandoc sample_1.md -f gfm -o sample_1.pdf
Here sample_1.md is input markdown file and -f is used to specify that the input format is GitHub style markdown. The -o option specifies the output file type based on extension. The default output is probably good enough. But I wished to customize hyperlinks, inline code style, add page breaks between chapters, etc. This blog post will discuss these customizations one by one.
pandoc has its own flavor of markdown with many useful extensions — see pandoc: pandocs-markdown for details. GitHub style markdown is recommended if you wish to use the same source (or with minor changes) in multiple places.
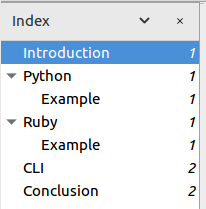
It is advised to use markdown headers in order without skipping — for example, H1 for chapter heading and H2 for chapter sub-section, etc is fine. H1 for chapter heading and H3 for sub-section is not. Using the former can give automatic index navigation on ebook readers.
On Evince reader, the index navigation for above sample looks like this:
Chapter breaks🔗
As observed from the previous demo, there are no chapter breaks by default. Searching for a solution online, I got this piece of tex code:
\usepackage{sectsty}
\sectionfont{\clearpage}
This can be added using the -H option. From pandoc manual:
-H FILE, --include-in-header=FILE
Include contents of FILE, verbatim, at the end of the header. This can be used, for example, to include special CSS or JavaScript in HTML documents. This option can be used repeatedly to include multiple files in the header. They will be included in the order specified. Implies --standalone.
The pandoc invocation now looks like:
$ pandoc sample_1.md -f gfm -H chapter_break.tex -o sample_1_chapter_break.pdf
You can add further customization to headings, for example:
\sectionfont{\underline\clearpage}to underline chapter names\sectionfont{\LARGE\clearpage}to allow chapter names to get even bigger
Here are some more links to read about various customizations:
- tex.stackexchange: section fonts
- tex.stackexchange: section colors
- tex.stackexchange: change section fonts
Changing settings via -V option🔗
-V KEY[=VAL], --variable=KEY[:VAL]
Set the template variable KEY to the value VAL when rendering the document in standalone mode. This is generally only useful when the --template option is used to specify a custom template, since pandoc automatically sets the variables used in the default templates. If no VAL is specified, the key will be given the value true.
The -V option allows to change variable values to customize settings like page size, font, link color, etc. As more settings are changed, better to use a simple script to call pandoc instead of typing the whole command on the terminal.
#!/bin/bash

pandoc "$1" \
    -f gfm \
    --include-in-header chapter_break.tex \
    -V linkcolor:blue \
    -V geometry:a4paper \
    -V geometry:margin=2cm \
    -V mainfont="DejaVu Serif" \
    -V monofont="DejaVu Sans Mono" \
    --pdf-engine=xelatex \
    -o "$2"
mainfontis for normal textmonofontis for code snippetsgeometryis for page size and marginslinkcolorwill set the color for internal links- this will also colorize other types of links
- set
urlcolorif you want to distinguish URLs and so on for other types
- to increase the default font size, use
-V fontsize=12pt- See stackoverflow: change font size if you need even bigger size options
Using xelatex as the pdf-engine helps to use any font installed in your system. One reason I chose DejaVu was because it supported Greek and other Unicode characters that were causing error with other fonts. See tex.stackexchange: Using XeLaTeX instead of pdfLaTeX for some more details.
The pandoc invocation is now through a script:
$ chmod +x md2pdf.sh
$ ./md2pdf.sh sample_1.md sample_1_settings.pdf
Do compare the pdf generated side by side with previous output before proceeding.
 On my system,
 DejaVu Serif did not have italic variation installed, so I had to use sudo apt install ttf-dejavu-extra to get it.
Syntax highlighting🔗
One option to customize syntax highlighting for code snippets is to save one of the pandoc themes and editing it. See stackoverflow: What are the available syntax highlighters? for available themes and more details (as a good practice on stackoverflow, go through all answers and comments — the linked/related sections on sidebar are useful as well).
$ pandoc --print-highlight-style=pygments > pygments.theme
Edit the above file to customize the theme. Use sites like colorhexa to help with color choices, hex values, etc. For this demo, the below settings are changed:
# by default, background is same as normal text
# change it to a shade of gray to easily distinguish code and text
"background-color": "#f8f8f8",

# change italic to false, messes up comments with slashes
# change comment text-color to yet another shade of gray
"Comment": {
    "text-color": "#9c9c9c",
    "background-color": null,
    "bold": false,
    "italic": false,
    "underline": false
},
Inline code
Similar to changing background color for code snippets, I found a solution online for inline code snippets as well.
\usepackage{fancyvrb,newverbs,xcolor}

\definecolor{Light}{HTML}{F4F4F4}

\let\oldtexttt\texttt
\renewcommand{\texttt}[1]{
  \colorbox{Light}{\oldtexttt{#1}}
}
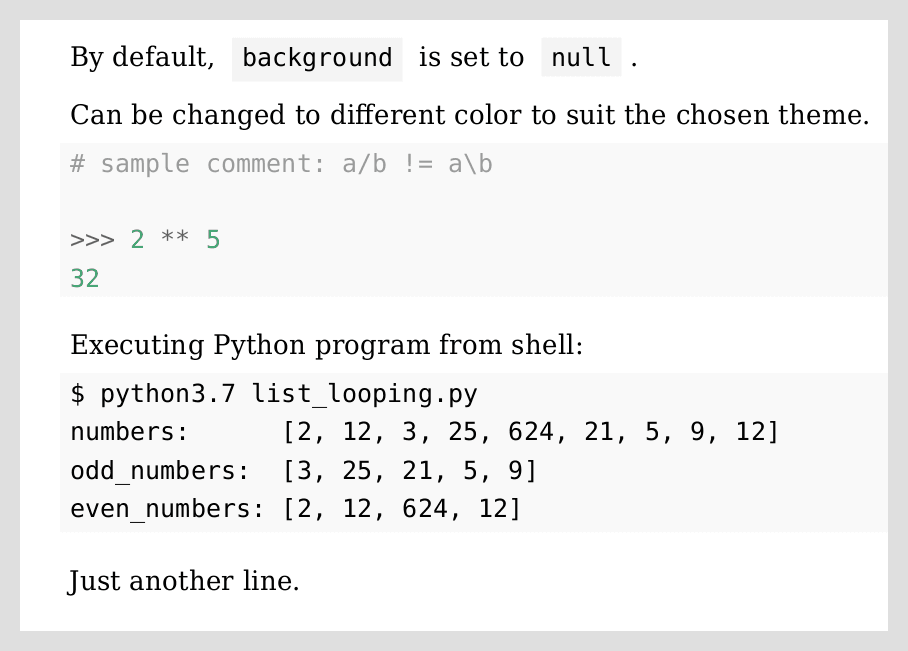
Add --highlight-style pygments.theme and --include-in-header inline_code.tex to the script and generate the pdf again.
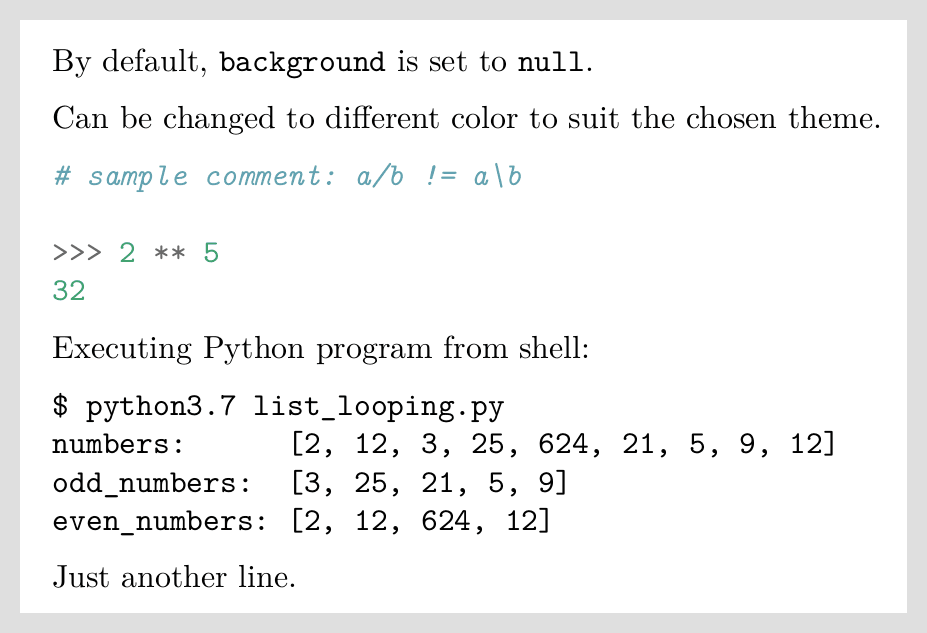
With pandoc sample_2.md -f gfm -o sample_2.pdf the output would be:
With ./md2pdf_syn.sh sample_2.md sample_2_syn.pdf the output is:
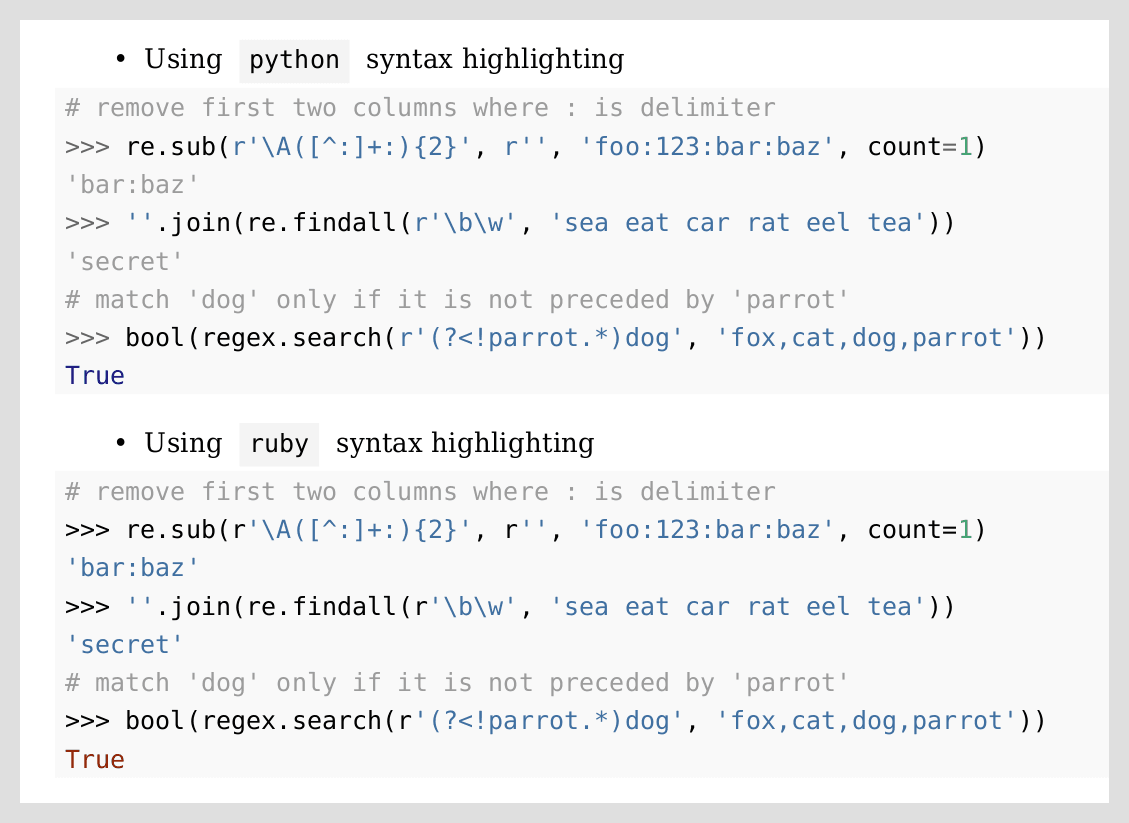
For my Understanding Python re(gex)? book, by chance I found that using ruby instead of python for REPL code snippets syntax highlighting was better. Snapshot from ./md2pdf_syn.sh sample_3.md sample_3.pdf result is shown below. For python directive, string output gets treated as a comment and color for boolean values isn't easy to distinguish from string values. The ruby directive treats string value as expected and boolean values are easier to spot.
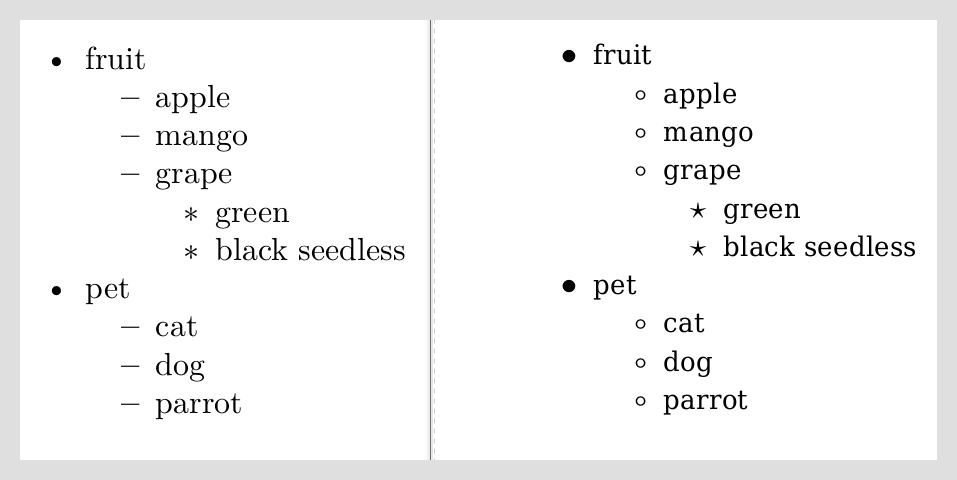
Bullet styling🔗
This stackoverflow Q&A helped for bullet styling.
\usepackage{enumitem}
\usepackage{amsfonts}

% level one
\setlist[itemize,1]{label=$\bullet$}
% level two
\setlist[itemize,2]{label=$\circ$}
% level three
\setlist[itemize,3]{label=$\star$}
Comparing pandoc sample_4.md -f gfm -o sample_4.pdf vs ./md2pdf_syn_bullet.sh sample_4.md sample_4_bullet.pdf gives:
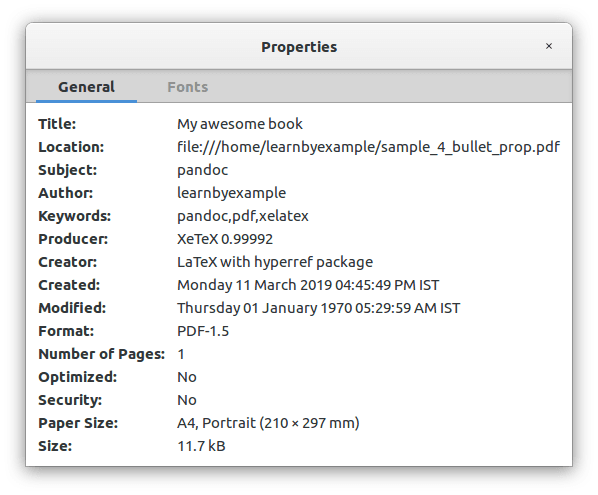
PDF properties🔗
This tex.stackexchange Q&A helped to change metadata. See also pspdfkit: What’s Hiding in Your PDF? and discussion on HN.
\usepackage{hyperref}

\hypersetup{
  pdftitle={My awesome book},
  pdfauthor={learnbyexample},
  pdfsubject={pandoc},
  pdfkeywords={pandoc,pdf,xelatex}
}
./md2pdf_syn_bullet_prop.sh sample_4.md sample_4_bullet_prop.pdf gives:
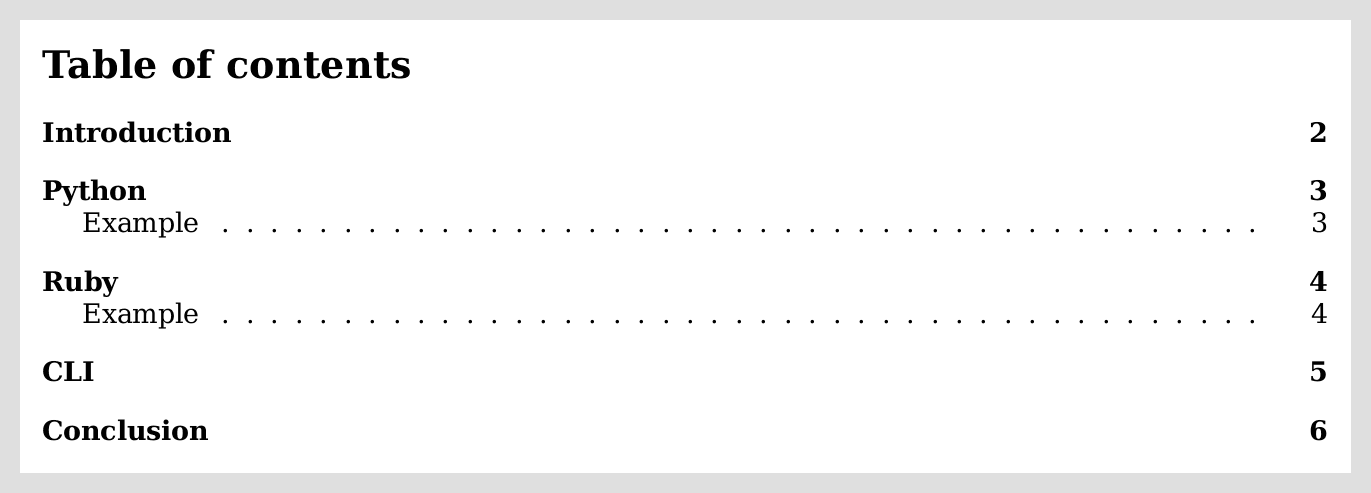
Adding table of contents🔗
There's a handy option --toc to automatically include table of contents at top of the generated pdf. You can control number of levels using --toc-depth option, the default is 3 levels. You can also change the default string Contents to something else using the -V toc-title option.
./md2pdf_syn_bullet_prop_toc.sh sample_1.md sample_1_toc.pdf gives:
Adding cover image🔗
To add something prior to table of contents, cover image for example, you can use a tex file and include it verbatim. Create a tex file (named as cover.tex here) with content as shown below:
\includegraphics{cover.png}
\thispagestyle{empty}
Then, modify the previous script md2pdf_syn_bullet_prop_toc.sh by adding --include-before-body cover.tex and tada — you get the cover image before table of contents. \thispagestyle{empty} helps to avoid page number on the cover page, see also tex.stackexchange: clear page.
The bash script invocation is now ./md2pdf_syn_bullet_prop_toc_cover.sh sample_5.md sample_5.pdf.
You'll need at least one image in input markdown file, otherwise settings won't apply to the cover image and you may end up with a weird output. sample_5.md used in the command above includes an image. And be careful to use escapes if the image path can contain tex metacharacters.
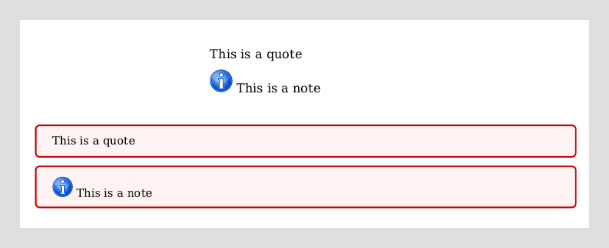
Stylish blockquote🔗
By default, blockquotes (lines starting with > in markdown) are just indented in the pdf output. To make them standout, tex.stackexchange: change the background color and border of blockquote helped.
Create quote.tex with the contents as shown below. You can change the colors to suit your own preferred style.
\usepackage{tcolorbox}
\newtcolorbox{myquote}{colback=red!5!white, colframe=red!75!black}
\renewenvironment{quote}{\begin{myquote}}{\end{myquote}}
The bash script invocation is now ./md2pdf_syn_bullet_prop_toc_cover_quote.sh sample_5.md sample_5_quote.pdf. The difference between default and styled blockquote is shown below.
Customizing epub🔗
For a long time, I thought epub didn't make sense for programming books. Turned out, I wasn't using the right ebook readers. FBReader was good for novels but not ebooks with code snippets. When I used atril, foliate or calibre ebook-viewer, the results were good.
I didn't know how to use css before trying to generate the epub version. Somehow, I managed to take the default epub.css provided by pandoc and customize it as close as possible to the pdf version. The modified epub.css is available from the learnbyexample.github.io repo. The bash script to generate the epub is shown below and invoked as ./md2epub.sh sample_5.md sample_5.epub. Note that pygments.theme is same as the pdf customization discussed before.
#!/bin/bash

pandoc  "$1" \
        -f gfm \
        --toc \
        --standalone \
        --top-level-division=chapter \
        --highlight-style pygments.theme \
        --css epub.css \
        --metadata=title:"My awesome book" \
        --metadata=author:"learnbyexample" \
        --metadata=lang:"en-US" \
        --metadata=cover-image:"cover.png" \
        -o "$2"
Resource links🔗
More options and workflows for generating ebooks:
- pandoc-latex-template — a clean pandoc LaTeX template to convert your markdown files to PDF or LaTeX
- Writing a book with pandoc, make, and vim
- Quarto — open source scientific and technical publishing system built on Pandoc
- quarkdown — a modern Markdown-based typetting system
- typst — a new markup-based typesetting system that is powerful and easy to learn
- Jupyter Book — open source project for building beautiful, publication-quality books and documents from computational material
- See also fastdoc — the output of fastdoc is an asciidoc file for each input notebook. You can then use asciidoctor to convert that to HTML, DocBook, epub, mobi, and so forth
- Mau — template-based markup language, heavily inspired by AsciiDoc
- Asciidoctor
- Sphinx
- Bookdown
- Emacs orgmode
- Markdeep
Miscellaneous
- Vim is saving me hours of work when writing books & courses
- Writing a Book with Unix
- askubuntu: How do I install fonts?
- tex.stackexchange: What best combination of fonts for Serif, Sans, and Mono do you recommend?
- LaTeX font catalogue
- Tools to support markdown authoring
- picular: search engine for colors and colorhexa
- ebooks.stackexchange