Grid layout and images
In an earlier project, you saw how to use the pack() method to manage layout of widgets. In this section, you'll see how to use the grid() method. As the name implies, this method helps to place widgets in a regular fashion based on horizontal and vertical values.
The Multiple choice questions project is a prerequisite for this project, specifically the lessons about the
tkintermodule.
Grid layout
Here's an example of placing nine buttons in a 3x3 grid.
# grid_layout.py
import random
import tkinter as tk

class Root(tk.Tk):
    def __init__(self):
        super().__init__()

        self.title('Grid Layout')
        self.geometry('200x200')

        self.frame = tk.Frame()
        self.frame.pack(expand=True)

        self.button = [None] * 9
        for i in range(9):
            r, c = divmod(i, 3)
            self.button[i] = tk.Button(self.frame, text=' ', font='TkFixedFont',
                                       command=lambda n=i: self.button_click(n))
            self.button[i].grid(row=r, column=c)

    def button_click(self, n):
        choice = random.randrange(2)
        character, color = (('x', 'red'), ('o', 'green'))[choice]
        self.button[n]['text'] = character
        self.button[n]['fg'] = color

if __name__ == '__main__':
    root = Root()
    root.mainloop()
- The
divmod()function gives you both the quotient and the remainder. Helpful here to assign row and column values for a particular button. - As mentioned before,
lambdaexpressions help when you need to pass arguments to the command function. Needed here because a single function handles click event for all of the buttons. - The click function randomly sets one of the two characters. To avoid the layout from changing due to differences in button text, monospace font is used. The default is a single space character (which is invisible on the screen) and valid characters are
xando.
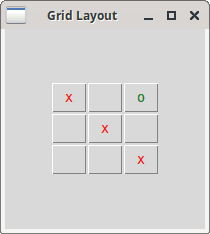
Image Labels
By default, a button widget changes appearance based on whether it is held down, mouse is hovering over it, etc. This works well for cases where a button can be clicked multiple times, but not for a single click requirement in a game. For example, after a particular button is clicked on the game board, there should be no more effects since that button cannot be clicked again. You cannot use the disabled state, since it will grey out the button.
You can programmatically handle those button events so that it behaves as you want. However, adding click functionality to a label widget is far easier. The downside is that you'll need to add code for changing the appearance of a label if is held down, etc. That is left as an exercise for you.
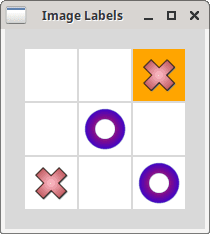
Here's an example of using images for labels and adding a click event for them.
# image_labels.py
import random
import tkinter as tk

class Root(tk.Tk):
    def __init__(self):
        super().__init__()

        self.title('Image Labels')
        self.geometry('200x200')

        self.frame = tk.Frame()
        self.frame.pack(expand=True)

        self.char_x = tk.PhotoImage(file='./char_x.png')
        self.char_o = tk.PhotoImage(file='./char_o.png')
        self.empty = tk.PhotoImage()

        self.label = [None] * 9
        self.last_click = 0
        for i in range(9):
            r, c = divmod(i, 3)
            self.label[i] = tk.Label(self.frame, image=self.empty,
                                     highlightthickness=1,
                                     width=50, height=50, bg='white')
            self.label[i].bind('<Button-1>',
                               lambda e, n=i: self.button_click(e, n))
            self.label[i].grid(row=r, column=c)

    def button_click(self, e, n):
        self.label[self.last_click]['bg'] = 'white'
        self.last_click = n
        choice = random.randrange(2)
        self.label[n]['image'] = (self.char_x, self.char_o)[choice]
        self.label[n]['bg'] = ('orange', 'grey')[choice]

if __name__ == '__main__':
    root = Root()
    root.mainloop()
- The
bind()method allows you to handle that particular event.<Button-1>event handles the left click of the mouse. The specified event gets passed as the first argument to the command function, so the label index is passed as the second argument. - The
highlightthicknessparameter specifies the area surrounding the widget. By default, this is0for labels and1for buttons. By setting this parameter to1and changing the background, you'll get the desired grid with a visible separator between the cells.- You can use the
highlightbackgroundparameter to change the color of this area.
- You can use the
- Clicking anywhere on these labels will randomly set one of the two images. The background color is also changed, so that you can keep track of which label was clicked most recently.
- The
tk.PhotoImage()method helps here to process PNG image files.- When no file is passed,
tk.PhotoImage()creates an empty image. Used here to initialize the labels.
- When no file is passed,
- The
widthandheightparameters are used to set the size of the label.
Note that PNG support was added recently. From tkdocs: images:
Out of the box, Tk 8.5 includes support for GIF and PPM/PNM images. Tk 8.6 added PNG to this short list. However, there is a Tk extension library called Img, which adds support for many others: BMP, XBM, XPM, JPEG, PNG (if you're using 8.5), TIFF, etc. Though not included directly in the Tk core, Img is usually included with other packaged distributions (e.g., ActiveTcl).
If you don't have PNG support, you can use pypi: Pillow instead:
from PIL import ImageTk, Image
image = ImageTk.PhotoImage(Image.open('image.png'))